5 Easy Ways to Plan for Every Learner With UDL

Differentiation isn’t something you bolt on after the lesson is built. It’s a decision you make before you write a single activity.
⏱ 6 min read · By Matt Faulkner · Pedagogy / Planning

Picture the lesson plan taking shape on your screen. Content descriptor pasted in. Learning intention written. Main activity mapped out for the class. Then, right at the end, you add a line: “adjustment for Sarah,” or “extension for the early finishers.”

It feels like good practice. In practice, it’s also the wrong order. To illustrate, you built the lesson for an imagined average student, then patched it for everyone who didn’t fit. The patch usually works, for a while. As a result, you solve the same problem lesson after lesson — instead of solving it once at the planning stage.

Universal Design for Learning (UDL) flips that order. Instead of building one pathway and adjusting it afterwards, you plan multiple ways in from the very first decision. Beyond that, it sits neatly alongside the backward design framework we’ve covered before. Same starting point — one extra lens over every choice that follows.


Why “Adjustments Later” Never Quite Works

The trouble with retrofitting isn’t the intent. It’s the timing. Every adjustment gets made under pressure, at the end of a planning session. In practice, that’s when your energy for creative problem-solving is lowest and the deadline is closest. Consequently, the graphic organiser gets left out — or the extension task becomes “read on quietly.”

At the same time, there’s a quieter cost. When adjustments arrive last, they read as exceptions to the “real” lesson. In other words, they’re not part of the plan — just a patch on it. Even so, students notice that framing, whether anyone says it aloud or not.

For example, we’ve covered low-prep differentiation moves elsewhere — the kind you reach for once a task is already built. UDL asks an earlier question instead. What if the task already worked for the widest range of learners, before any adjustment was needed?


What UDL Actually Asks You to Plan For

UDL, developed by CAST, organises planning around three questions rather than one. First, multiple means of engagement. Why would this student care — and does that reason hold for more than one kind of student? Second, multiple means of representation. Is the content available through more than one channel — text, image, spoken explanation? Third, multiple means of action and expression. Can students show what they know in more than one way, while still being judged against the same success criterion?

Put simply, none of those questions ask you to lower the learning intention. Instead, they ask you to widen the road leading to it.

UDL is not about lowering the bar. It’s about building more doors into the same room.

Where UDL Fits Inside Backward Design

If you already plan backwards from the learning intention, UDL doesn’t replace that process. In practice, it sharpens it. At Stage 1, ask whether the intention can be reached — and cared about — through more than one entry point. At Stage 2, ask whether your formative evidence has to look identical for every student. Even so, a spoken explanation can count as evidence too — just as validly as a written one. At Stage 3, build the variety in before you teach the lesson, not after you notice it’s needed.

That’s the shift in one sentence. Instead of asking who will struggle with this activity after it’s built, ask which students the design already leaves out.


A Year 4 Worked Example

For example, here’s what that looks like against a real content descriptor, rather than in the abstract.

🎯 UDL in Action — Year 4 Persuasive Writing
  • Curriculum anchor: AC9E4LY06 — Plan, create and revise written and multimodal texts, including persuasive texts.
  • Learning intention: “We are learning to persuade a reader using reasons and evidence.”
  • Engagement: Students choose their topic from a short, locally relevant list — not one topic assigned to everyone.
  • Representation: The teacher models the structure through a think-aloud, a labelled example, and a simple graphic organiser.
  • Action and expression: Students meet the same success criterion by writing a paragraph, recording a spoken pitch, or building an annotated poster.

In other words, notice what stayed constant — the content descriptor, the learning intention, and the success criterion. Only the entry points changed.


This Isn’t Differentiation Downward

For this reason, it’s worth being explicit here, because the two ideas get confused constantly. Differentiating downward means changing what a student is expected to learn — a simpler text, a lower target, a smaller ask. By contrast, UDL keeps the expectation identical for everyone and changes how students reach it.

Beyond that, this distinction matters for AITSL Standard 1.5 — and for the students in front of you. Planning for variability is not the same as planning for less.

Finally, once a lesson is built this way, a second question follows naturally. How do you adjust support in the moment, as students actually work through the task? That’s where frameworks like the Gradual Release of Responsibility come in — and it’s exactly where this series goes next.

💬 Your Turn! Think about your last unit plan. Where did the “adjustments” get added last — and what would it look like to build them in first instead? Share your experience below.

References

Australian Curriculum, Assessment and Reporting Authority (ACARA). (2023). Australian Curriculum v9.0. https://v9.australiancurriculum.edu.au

Australian Institute for Teaching and School Leadership (AITSL). (2018). Australian Professional Standards for Teachers (Standard 1.5). https://www.aitsl.edu.au/teach/standards

CAST. (2024). Universal Design for Learning Guidelines (version 2.2). https://udlguidelines.cast.org

Novak, K. (2022). UDL now! A teacher’s guide to applying universal design for learning (2nd ed.). CAST Professional Publishing.

Rose, D. H., & Meyer, A. (2002). Teaching every student in the digital age: Universal design for learning. ASCD.

Wiggins, G., & McTighe, J. (2005). Understanding by design (2nd ed.). ASCD.

7 Routines That Will Actually Stop Day One Chaos

Classroom Management · Procedures vs Rules

7 Routines That Will Actually Stop Day One Chaos

A classroom doesn’t run on rules. It runs on routines you’ve rehearsed until nobody has to think about them.

⏱ 6 min read · By Matt Faulkner · Classroom Management / New Teachers

Last week’s post argued that classrooms drift toward whatever behaviour feels easiest, not whatever behaviour is best. That piece ended with a promise. The next series would look at the habits we build deliberately, in the first days of any class. This is where that starts.

Picture a typical Day One. 28 new faces, a seating plan that won’t survive recess, and a list of rules already half-forgotten by lunchtime. By Tuesday, the rules are still on the wall. The routines, if nobody ever taught any, are not.

Most of that gap isn’t a discipline problem. It’s a missing procedure. That distinction comes from Harry and Rosemary Wong’s long-running guide, The First Days of School. It changes how the first days should be planned.


Why the First Days Decide the Whole Year

Harry Wong spent decades studying what separated highly effective teachers from the rest. His finding, repeated across editions of the book since 1991, is blunt. The degree to which a teacher establishes clear procedures in the first week predicts most of the year that follows. In other words: not the teacher’s personality, not the difficulty of the class, but the procedures.

The First Days of School has sold close to four million copies since it first appeared. It remains one of the most assigned texts in teacher preparation programs worldwide. That kind of staying power is rare in education. In practice, it usually means an idea is simple enough to use on a Monday morning. It is also durable enough to survive decades of classroom change.

For Australian preservice and early-career teachers, this maps directly onto AITSL Standard 4. The standard asks teachers to create and maintain supportive and safe learning environments. Standard 4.2, in particular, asks you to manage classroom activities so that all students are productively engaged. In other words, that is not a personality trait. It is a set of taught, rehearsed behaviours.


Rules vs Procedures: The Distinction Most New Teachers Miss

Most new teachers walk into Day One with a list of rules. Be respectful. Be on time. Bring your equipment. These are not wrong. Even so, they’re not what gets a class running smoothly.

A rule governs behaviour broadly and carries a consequence when it’s broken. By contrast, a procedure is different. It’s how something gets done: how students enter the room, how they get your attention, how they hand in work. It carries no penalty at all. You don’t punish a student for not yet knowing a procedure. You teach it again.

Wong puts it plainly. Procedures govern almost everything we do outside school too, from boarding a plane to ordering at a drive-through. Without them, ordinary moments become mayhem. Students need the same scaffolding. As a result, they settle fastest when they know exactly what happens next, every time.

Rules tell students what will happen if they get it wrong. Procedures make sure they never have to wonder what to do in the first place.

This is also where last week’s post on classroom friction connects directly. A well-taught procedure is the lowest-friction path available — for both the student and you. Skip the procedure, and the easiest path students find on their own is rarely the one you wanted.


Seven Procedures Worth Teaching First

You don’t need 30 procedures by Friday. Wong’s own advice is to start small and add more as the year settles. For an Australian primary classroom, these seven cover most of what derails a typical day.

🪜 7 Procedures to Nail in Week One
  • Entering the room. Where bags go, what happens at the door, what students do the moment they sit down. This single procedure prevents most of the chaos of a Monday morning.
  • Getting attention. One consistent signal works best — a raised hand, a chime, a clap pattern. Teach it explicitly, and use it every single time, not just when things get loud.
  • Asking for help. A clear way to flag “I’m stuck” that doesn’t require shouting your name across the room or simply downing tools.
  • Finishing early. Without this one, your fastest finishers will invent their own procedure — and it usually involves bothering everyone still working.
  • Handing in work. One tray, one basket, one digital folder. Consistency here saves you hours of chasing missing work later in the term.
  • Transitions. Moving from mat to desks, from one subject to the next. Transitions eat more instructional time than almost anything else when they’re left unplanned.
  • Packing up. What gets put away, by whom, and in what order. Rehearse it until it takes minutes, not the last 10 chaotic ones of the day.

How to Actually Teach a Procedure

Announcing a procedure once is not teaching it. In practice, students need to see it, try it, and repeat it until it requires no thought at all. Wong’s cycle is simple. It works just as well for a five-year-old as it does for a Year 6 class mid-term.

🎯 The Teach → Model → Practise → Reinforce Cycle
  • Teach it. Say it once, plainly: “When I raise my hand, it means stop talking and look at me.” One sentence, not a five-minute lecture.
  • Model it. Show what it looks like — and, just as usefully, what it doesn’t. Some teachers ask a confident student to model the “wrong” version first, for a laugh, before showing the right one.
  • Practise it. Have the whole class try it, immediately, while the explanation is still fresh. Do it again if the first attempt is messy. This costs two minutes and saves you weeks.
  • Reinforce it. Notice it out loud for the first fortnight. “I love how quickly tables one and two packed up” does more work than any poster on the wall.

Here’s the part most new teachers skip: step three. It feels slow to stop and practise lining up on the first afternoon. There is content to cover and a term to plan. That said, the two minutes spent rehearsing a procedure on Day One are cheaper than the alternative. Without it, you lose those two minutes again — badly — every single day for the rest of the term.


What Happens in Week Three, When It Slips

It will slip. A wet-weather day, a relief teacher, an excursion — and suddenly half the class has forgotten how lining up works. Even so, this is normal, not a sign you’ve failed.

The fix is the same cycle, not a punishment. Re-teach the procedure, briefly, the way you’d re-teach a maths concept students have half-forgotten over the holidays. This sits squarely inside AITSL Standard 4.3 — managing challenging behaviour. It’s worth noticing that the standard talks about managing, not punishing.

Beyond that, it’s also worth watching which students the procedure is failing for, and why. That kind of noticing connects directly to formative assessment in any other part of your teaching. A procedure that has quietly broken down for one student, while the rest of the class moves on, is data. Treat it that way.

Procedures get you a class that runs without your constant intervention. Even so, they don’t, on their own, get you a class that feels safe enough to take risks. They don’t make the rules feel owned, rather than imposed. That’s where this series goes next. First, what has to be true before any routine can stick. Then, building expectations with your class, instead of just for them. For now, though, start here. Plan it backwards, the same way you would a lesson. Decide what a smooth handover looks like, then teach directly toward it.

What’s the one procedure that took you the longest to get right? Was it transitions, attention signals, or something nobody warns you about in a teaching degree? Tell us what worked — and what didn’t — in the comments below.

References

Wong, H. K., & Wong, R. T. (2018). The first days of school: How to be an effective teacher (5th ed.). Harry K. Wong Publications.

Australian Institute for Teaching and School Leadership (AITSL). (2018). Australian Professional Standards for Teachers (Standard 4). aitsl.edu.au

5 Powerful Moves That Will Actually Make Students Struggle

Week 15 · Pedagogy · Task Design

5 Task Design Moves That Actually Stretch Every Student

Productive struggle isn’t what happens when a task is too hard. It’s what happens when you’ve designed it just right.
⏱ 6 min read · By Matt Faulkner · Pedagogy / New Teachers

There is a particular kind of classroom frustration that has nothing to do with behaviour. It is the lesson where students race through the task, and you realise about twelve minutes in that it asked nothing of them. Or the opposite: where you pitched it harder and now three hands are up, six students are staring at the ceiling, and two have quietly written their name and stopped.

Both of those outcomes have the same root cause. The task was not designed with stretch in mind. It was designed with content in mind — and there is a difference.

Last week, we looked at how backward design changes what you plan for. This post takes the next step. Once you know where students need to get to, the question becomes: how do you design the task that gets them there — one that genuinely challenges without tipping into frustration? The answer has a name in the research literature: productive struggle. And it can be deliberately built in.


What “Just Beyond Comfortable” Actually Means

Lev Vygotsky described the zone of proximal development (ZPD) as the space between what a learner can do independently and what they can do with support. Tasks that sit below the ZPD require no new thinking. Tasks that sit too far above it produce confusion and disengagement. Tasks that sit right at the edge of the ZPD — just beyond what a student can currently do alone — are where genuine learning occurs.

John Sweller’s cognitive load theory adds important precision here. Working memory is limited. When a task overloads it — too many new elements at once, too much unfamiliar vocabulary, too many simultaneous steps — students cannot process the content, let alone learn from it. In other words, difficulty alone is not the goal. Productive difficulty is. The task needs to be complex enough to require real thinking, but structured enough that thinking is actually possible.

For teachers, that distinction is everything. A task is not automatically rigorous because it is hard. It is rigorous when it demands higher-order thinking within a structure students can manage. As a result, designing for productive struggle is less about making tasks harder and more about making them smarter.


The Mindset Piece: Designing for Effort, Not Just Difficulty

Carol Dweck’s research on growth mindset is relevant here — but not in the way it is usually applied. It is not enough to tell students that struggle is good for them. If the task design sends the opposite message — if there is only one right answer, if being wrong feels like failure, if speed is implicitly rewarded — then the growth mindset poster on the wall is just decoration.

Dweck’s central finding is that students who believe intelligence is fixed avoid challenge to protect their self-image. By contrast, students who believe ability grows through effort seek out challenge. The task itself can reinforce either belief. A task with one quick answer rewards speed and confidence. A task that requires iteration, justification, and revision sends the message that effort is the point.

That said, this is not about lowering the stakes or removing rigour. It is about designing tasks where being stuck is a legitimate part of the process — and where the structure supports students to push through, rather than wait for the teacher to rescue them.

There is a timely corollary here for AI use in classrooms. Cognitive scientist Paul Kirschner draws a useful distinction between cognitive offloading and cognitive outsourcing. Offloading — writing notes, drawing a diagram, working through steps on paper — frees up working memory while keeping the student as the thinker. Outsourcing — asking AI to explain, summarise, or produce — transfers the thinking itself to an external agent. The student receives a finished product. Nothing is encoded in long-term memory. For teachers designing tasks with productive struggle in mind, the question is worth asking: does the way students are using AI protect generation, or remove it entirely?


5 Design Moves That Build Productive Struggle In

These moves can be applied individually or in combination. They work across year levels and learning areas. Even one move applied consistently will shift what students experience in your classroom.

🎯 5 Task Design Moves for Productive Struggle
  • Move 1 — Open the entry point. Design tasks with a low floor and a high ceiling. Every student can begin; not every student will reach the same endpoint. This removes the paralysis of “I don’t know where to start” while keeping stretch available for those who are ready for it. Jo Boaler’s work on low-floor/high-ceiling tasks in mathematics is the clearest articulation of this principle in practice — and her YouCubed site has free task banks worth bookmarking.
  • Move 2 — Withhold the scaffold before the answer. Give students the problem before you give them the method. Even five minutes of initial thinking — before any explicit teaching — activates prior knowledge, surfaces misconceptions, and means the instruction that follows has somewhere to land. This is not about leaving students stranded. It is about priming the brain to receive new learning. There is a memory research term for what happens here: the Generation Effect. When students generate an answer — retrieve a word, attempt a problem, construct an explanation — they remember it significantly better than when the same information is simply presented to them. The act of production is itself the act of learning. Jamie Clark’s DistillED newsletter on the Generation Effect is worth reading alongside this post — it is one of the clearest explanations of the research and its classroom implications available right now.
  • Move 3 — Limit the information given upfront. Real-world problems rarely arrive with all the relevant information pre-sorted. Give students a question and some — not all — of the information they need. Require them to identify what’s missing or what they’d need to know. That act of identifying gaps is itself higher-order thinking.
  • Move 4 — Require justification, not just answers. “What is the answer?” asks for recall. “How do you know?” asks for thinking. Build justification into the task structure — not as an add-on, but as the core requirement. A student who can get the right answer but cannot explain it has not yet learned what you think they’ve learned.
  • Move 5 — Build in a “stuck” protocol. Before students begin, name what to do when they get stuck. Three specific options: re-read the task, try a different starting point, or discuss with a partner using a sentence starter (“I think the problem is asking me to…”). This removes the habit of raising a hand the moment something feels difficult — and it signals that being stuck is expected, not a sign of failure.

What This Looks Like in HASS: Year 5 Source Analysis

A standard source analysis task gives students a primary source and asks them to identify the author, date, and one key message. That is a recall task. It sits well below the ZPD for most Year 5 students who have been doing this since Year 3.

A productive struggle version applies Moves 1, 3, and 4. Students receive two short sources on colonial settlement — a settler’s diary entry and an account from an Aboriginal perspective — with no guiding questions. The task is simply: what story are these two sources telling, and where do they disagree? From there, students must write one claim supported by evidence from both sources.

The open entry point (Move 1) means every student can begin with an observation. Limiting the guiding questions (Move 3) means students must decide what matters. Requiring a supported claim (Move 4) means the answer is not retrievable without genuine analysis. The teacher’s role shifts from answer-giver to question-asker — circulating and probing with higher-order questions that push thinking further rather than narrowing it toward a predetermined response.

For more on structuring formative checks around this kind of task, the post on formative assessment strategies covers exit ticket design in detail.


What This Looks Like in Maths: Year 3 Multiplication

A standard multiplication task: Solve 3 × 4. Solve 5 × 6. Solve 7 × 8. Students either know these or they don’t. There is no thinking available beyond retrieval — and no entry point for students who aren’t yet fluent.

A productive struggle version uses Move 1 and Move 2. The teacher displays 24 counters on the interactive whiteboard and asks: how many different ways can you arrange these into equal rows? No method has been taught yet. Students work with their own counters, recording each arrangement. From there, the class shares findings — and the teacher introduces the array and the number sentence as the language for what students already discovered.

The low floor means students working at different points of readiness can all begin. The high ceiling means a student who finds three arrangements quickly is asked: how do you know you’ve found them all? That follow-up question — requiring justification and systematic thinking — is where the stretch lives. In practice, it produces more mathematical reasoning than a worksheet of 20 isolated facts ever will.

Beyond that, notice what the task design does to the explicit teaching that follows. Because students have already struggled with the concept, the instruction has a problem to solve. It lands differently than instruction delivered cold.


Where the Gradual Release Fits

Fisher and Frey’s Gradual Release of Responsibility model — I do, We do, You do — is one of the most widely used frameworks in Australian primary schools. It is also frequently misapplied in ways that accidentally prevent productive struggle.

The problem arises when the “I do” phase is so thorough that the “You do” phase requires nothing beyond imitation. Students are not struggling — they are copying. The GRR is designed to scaffold students into independence, not to eliminate the experience of not-yet-knowing.

Used well, the GRR creates the conditions for productive struggle at the “You do” stage by deliberately withdrawing support at the right moment. The key is that the “We do” phase builds enough shared understanding that students can tolerate uncertainty — not so much that the independent task becomes a rehearsal of what they’ve already watched you do.

That calibration — knowing when to hold the scaffold and when to pull it back — is one of the most important professional judgements in teaching. Even so, it is a judgement that gets easier with practice. And it starts with task design that has stretch built in from the beginning.

Design the task for the thinking you want, not just the answer you need. Students rise to what the task demands of them — and rarely higher.

💬 Over to You — Which of the five moves are you already using, and which one are you going to try first? Or if you’ve got a task that created genuinely productive struggle in your classroom, share it below. The best ideas on this site always come from teachers who’ve already done the hard yards.

References

Bertsch, S., Pesta, B. J., Wiscott, R., & McDaniel, M. A. (2007). The generation effect: A meta-analytic review. Memory & Cognition, 35(2), 201–210. https://doi.org/10.3758/BF03193441

Bjork, E. L., & Bjork, R. A. (2011). Making things hard on yourself, but in a good way: Creating desirable difficulties to enhance learning. In M. A. Gernsbacher, R. W. Pew, L. M. Hough, & J. R. Pomerantz (Eds.), Psychology and the real world: Essays illustrating fundamental contributions to society (pp. 56–64). Worth Publishers.

Boaler, J. (2016). Mathematical mindsets: Unleashing students’ potential through creative math, inspiring messages and innovative teaching. Jossey-Bass.

Dweck, C. S. (2006). Mindset: The new psychology of success. Random House.

Fisher, D., & Frey, N. (2014). Better learning through structured teaching: A framework for the gradual release of responsibility (2nd ed.). ASCD.

Kirschner, P. A. (2026). Offloading? No outsourcing! Retrieved from https://paulkirschner.com

Slamecka, N. J., & Graf, P. (1978). The generation effect: Delineation of a phenomenon. Journal of Experimental Psychology: Human Learning and Memory, 4(6), 592–604. https://doi.org/10.1037/0278-7393.4.6.592

Sweller, J. (1988). Cognitive load during problem solving: Effects on learning. Cognitive Science, 12(2), 257–285. https://doi.org/10.1207/s15516709cog1202_4

Vygotsky, L. S. (1978). Mind in society: The development of higher psychological processes. Harvard University Press.

How Smart Teachers Plan Backwards — and Get Better Results

Here is a question worth sitting with: when you plan a lesson, what do you plan first? If the answer is “the activity” — the game, the worksheet, the group task — you are in good company. Most new teachers start there. In practice, that instinct is also the source of one of the most common planning problems in Australian classrooms: lessons that are busy but not particularly purposeful.

The shift that separates competent planning from genuinely effective planning is deceptively simple. Expert teachers start at the end. They ask: what do students need to know or be able to do by the close of this lesson? From there, everything else flows backwards from that answer — the activities, the questions, the formative checks.

That approach has a name: backward design. Put simply, it means designing for learning rather than for activity. This post explains how it works, why the research supports it, and what it looks like in two real Australian classrooms — one in HASS, one in Maths.


Why “Covering the Content” Isn’t Planning

Grant Wiggins and Jay McTighe introduced backward design in Understanding by Design (2005) — and it remains one of the most cited frameworks in curriculum planning. Their core argument is straightforward: if you design a lesson around an activity, the activity becomes the goal. If you design it around a learning outcome, the activity becomes the vehicle.

The difference matters more than it sounds. An activity-first lesson might be engaging and enjoyed by students. By contrast, a learning-first lesson does all of that and moves students measurably closer to a specific understanding. One fills time well. The other changes what students can do.

John Hattie’s research reinforces this. In Visible Learning for Teachers (2012), he identifies clear learning intentions and success criteria as among the highest-leverage moves a teacher can make — with an effect size of 0.75 on student achievement. That said, intentions only work when they are genuinely specific. “Students will learn about fractions” is not a learning intention. “Students will be able to add fractions with the same denominator and explain why the denominator stays the same” is.

The Three-Stage Planning Framework

Wiggins and McTighe describe backward design in three stages. In the Australian context, each maps directly onto the AITSL Professional Standards that preservice and early-career teachers are assessed against. For that reason, understanding the framework is not just good pedagogy — it is also good professional preparation.

🪜 Backward Design: Three Stages
  • Stage 1 — Identify desired results. What should students know, understand, and be able to do? This comes directly from the Australian Curriculum content descriptor and achievement standard for your year level. This is where AITSL Standard 2 (Know the content and how to teach it) does its work — you cannot write a learning intention for content you don’t understand deeply yourself.
  • Stage 2 — Determine acceptable evidence. How will you know students have learned it? This is your assessment — not just the end-of-unit test, but the formative check you build into the lesson itself. Exit tickets, questioning, observation, mini whiteboards. AITSL Standard 5 (Assess, provide feedback and report) lives here.
  • Stage 3 — Plan learning experiences. Only now do you choose activities — the ones that most efficiently move students from where they are to where Stage 1 says they need to be. This is AITSL Standard 3 (Plan for and implement effective teaching and learning) in action.

Notice the order. Assessment comes before activities. For most new teachers, that sequence feels backwards — even counterintuitive. In practice, it is the sequence that makes every other planning decision easier. Each activity can then be evaluated against one clear question: does this move students toward the learning intention, or does it just fill time nicely?


Stage 1 in Practice: Writing a Learning Intention That Works

A learning intention describes what students will learn — not what they will do. “Students will complete a fact file about ancient Egypt” is a task description. By contrast, “Students will identify two ways ancient Egyptians adapted their way of life to the Nile River” is a learning intention. The distinction is worth practising until it becomes automatic.

Hattie suggests sharing the learning intention with students at the start of the lesson — not as a compliance exercise, but because students who know where they are going are better placed to monitor their own progress. That self-monitoring is itself a high-leverage learning behaviour. For this reason, the learning intention pairs naturally with a success criterion: a student-facing description of what meeting the intention looks like in practice. The Australian Curriculum v9.0 achievement standards are the most reliable anchor for writing success criteria at the right level.

✏️ Learning Intention vs Success Criterion — The Difference
  • Learning intention: “We are learning to identify how the features of a place influence the way people live.” (The what of learning — teacher-language, curriculum-anchored.)
  • Success criterion: “I can name two features of the Nile River and explain how each one shaped life for ancient Egyptians.” (The how will I know — student-language, observable, specific.)
  • Not this: “We are learning about ancient Egypt.” (Too broad — students cannot self-assess against it, and neither can you.)

AITSL Standard 1 (Know students and how they learn) shapes how you write these. A success criterion pitched at the wrong level — too abstract for Year 3, too simple for Year 6 — will not function as a genuine reference point for students. In other words, knowing your cohort is not separate from writing good intentions. It is part of the same act.


Worked Example 1: Year 5 HASS

The following example applies backward design to a Year 5 HASS lesson on colonial Australia, anchored to the Australian Curriculum.

📋 Backward Design in Action — Year 5 HASS
  • Curriculum anchor: AC9HS5K03 — The impact of colonial settlement on the lives of Aboriginal and Torres Strait Islander Peoples.
  • Stage 1 — Learning intention: “We are learning to explain how colonial settlement affected the lives of Aboriginal Peoples, using specific evidence.”
  • Success criterion: “I can describe at least two impacts of colonial settlement on Aboriginal Peoples and support each with a piece of evidence from a source.”
  • Stage 2 — Formative evidence: An exit ticket — students write two sentence starters: “One impact was… because the evidence shows…” and “Another impact was… For example…” This is collected before students leave and informs the next lesson’s starting point. For more on making exit tickets work, see our post on formative assessment strategies.
  • Stage 3 — Learning activities: (a) Paired analysis of two short primary sources — a settler diary entry and an account from an Aboriginal perspective. (b) Structured discussion: what do these sources agree on? What do they show differently? (c) Individual written response using the exit ticket stems. The Venn diagram activity — which we’ve discussed before as an alternative to the overused KWL chart — works well at step (b) to surface the contrast between sources.
  • AITSL connection: Standard 1.4 (Strategies for teaching Aboriginal and Torres Strait Islander students) and Standard 2.4 (Understand and respect Aboriginal and Torres Strait Islander people) are both directly relevant here. Source selection and discussion framing must be handled with cultural care and, where possible, informed by community consultation.

Worked Example 2: Year 3 Maths

The same framework applies equally to Maths — where the temptation to jump straight to a worksheet or manipulative activity is especially strong. Even so, the three-stage sequence holds. Start with what students need to understand; build the assessment check; then choose activities that close the gap.

📋 Backward Design in Action — Year 3 Maths
  • Curriculum anchor: AC9M3N04 — Multiply and divide using a range of mental and informal written strategies.
  • Stage 1 — Learning intention: “We are learning to use an array to show how multiplication works and explain what the rows and columns represent.”
  • Success criterion: “I can draw an array for a multiplication fact, label the rows and columns, and write the matching number sentence.”
  • Stage 2 — Formative evidence: Mini whiteboard check — teacher calls a multiplication fact (e.g. 3 × 4), students draw the array and hold it up simultaneously. Teacher scans for: correct dimensions, correct orientation, students who have drawn repeated addition rather than an array. That pattern in the errors pinpoints exactly where re-teaching is needed. See our post on reading the room mid-lesson for more on using student responses as real-time data.
  • Stage 3 — Learning activities: (a) Hook: teacher places 12 counters on a document camera and asks — “how many ways can I arrange these into equal rows?” Students explore with their own counters. (b) Explicit teaching: name the array, define rows and columns, connect to the number sentence. (c) Guided practice: three teacher-led examples with student input. (d) Independent practice: students draw and label three arrays of their choice, then write the matching number sentence. (e) Mini whiteboard exit check as described above.
  • AITSL connection: Standard 2.1 (Content and teaching strategies of the teaching area) — understanding why arrays work (not just how to draw them) is essential before teaching this lesson. Standard 3.3 (Use teaching strategies) — the move from concrete (counters) to representational (drawn array) to abstract (number sentence) is the CRA sequence, and it should be deliberate, not accidental.


The Teaching-Learning Cycle: Beyond a Single Lesson

Backward design works for a single lesson. It works even better when it organises a whole unit. The teaching-learning cycle used across Australian curriculum areas — building the field, deconstruction, joint construction, independent construction — is itself a backward-designed structure. You begin with the end text or performance in mind and work back through the scaffolding students need to get there.

For new teachers, the most practical application is this: before you plan any lesson in a unit, write the end-of-unit assessment task first. Not after you’ve taught everything — before. That task becomes your compass. Consequently, every lesson can be evaluated against one question: does this move students closer to being able to do that?

Beyond that, this approach connects directly to what we’ve explored in our posts on designing a performance of worth and feedback that feeds forward — both of which assume a clear destination that students are working toward. Without a backward-designed starting point, those strategies lose their anchor.

A Note on Using AI in This Process

If you are using AI to support your planning — and there are good reasons to — backward design gives you a much stronger prompt structure. Instead of asking AI to “write a lesson plan on fractions,” give it your learning intention, your success criterion, and your formative check. From there, ask it to suggest activities that bridge the gap. That sequence produces something genuinely useful. By contrast, starting with “write me a lesson” produces something generic.

In other words, the quality of your AI output is a direct reflection of how clearly you have done Stage 1 yourself first. The framework does not become less relevant when AI is involved. If anything, it becomes more important.


The One-Page Planning Habit

For preservice teachers on prac, and for first-year teachers building confidence, a full backward-design unit plan for every lesson is not realistic. That said, the thinking behind backward design can be applied in under five minutes per lesson with a simple habit. Before you open any planning document, write three things on a sticky note.

🎯 The Three-Question Planning Check
  • What will students be able to do by the end that they couldn’t do at the start? (Your learning intention — one specific, observable thing.)
  • How will I know if they’ve got there? (Your formative check — exit ticket, whiteboard, observation, question.)
  • What is the most direct path from here to there? (Your activity sequence — chosen because it serves the intention, not because it fills the time.)

Those three questions, answered honestly before you start planning the rest, will improve your lessons more reliably than any template, resource pack, or planning app. They are the essence of what AITSL Standard 3 asks of you. Put simply, they are the difference between a lesson that covers content and a lesson that builds learning.

“Don’t ask ‘what will I teach today?’ Ask ‘what will students be able to do at the end that they couldn’t do at the start?’ The answer to the second question is your lesson.” — TeacherTalk

💬 Your Turn! Do you plan backwards from the learning intention — or do you start with the activity and work forward? And if you’ve made the switch to backward design, what changed for you? Share below — your experience is exactly what another new teacher needs to read this week.

References

Australian Curriculum, Assessment and Reporting Authority (ACARA). (2023). Australian Curriculum v9.0. https://v9.australiancurriculum.edu.au

Australian Institute for Teaching and School Leadership (AITSL). (2018). Australian Professional Standards for Teachers (Standards 1, 2, 3 & 5). https://www.aitsl.edu.au/teach/standards

Hattie, J. (2012). Visible learning for teachers: Maximising impact on learning. Routledge.

Hattie, J. (2009). Visible learning: A synthesis of over 800 meta-analyses relating to achievement. Routledge.

Wiggins, G., & McTighe, J. (2005). Understanding by design (2nd ed.). ASCD.

Digital Citizenship: Teaching Kids to Think Online

Something shifted in Australian schools on 10 December 2025. The world’s first social media minimum age law came into effect, requiring platforms including Instagram, TikTok, Snapchat, X, and YouTube to take reasonable steps to prevent Australians under 16 from holding accounts. Whether you support the policy or not, one thing is certain: it has made digital citizenship conversations in primary schools more urgent, more real, and more relevant than ever.

Because here is the truth that no law changes: students are navigating a complex, fast-moving digital world every single day, and schools are one of the few places where they can be taught — explicitly, systematically, and safely — how to do that well. Digital citizenship is not a poster on the wall or a one-off lesson in Term 2. It is a set of thinking skills that, like all thinking skills, need to be taught, practised, and revisited throughout a child’s entire schooling.

This is the first of three posts in our Teaching in the Digital Age mini-series. Today we focus on digital citizenship and online safety. Next week, we look at using AI as your planning partner. And in the final post, we revisit QR codes and a broader toolkit of practical digital tools for any classroom, any budget.


What Digital Citizenship Actually Means

Digital citizenship is often reduced to “be nice online” — a well-meaning but insufficient framing. The eSafety Commissioner, Australia’s independent regulator for online safety, defines digital literacy as the knowledge and skills students need to create, manage, communicate and investigate data, information and ideas, and solve problems — in ways that protect the safety of themselves and others in digital environments.

That is a much bigger brief than being polite on social media. It encompasses critical thinking about online content, understanding of digital footprints and privacy, the capacity to identify misinformation and manipulation, the ability to seek help when something goes wrong, and the social and emotional skills to manage online relationships with the same care they’d bring to offline ones.

Think of it this way: we teach students road safety not just by telling them to look both ways, but by building a genuine understanding of traffic, risk, judgement, and what to do in an emergency. Digital citizenship deserves the same depth.

The eSafety Commissioner: Your Best Free Resource

If you haven’t explored the eSafety Schools’ Hub recently, now is the time. It is genuinely one of the best free classroom resources available to Australian teachers, and it has been significantly updated following the social media age restriction changes.

The hub provides curriculum-linked classroom resources from Foundation to Year 12, covering online safety, cyberbullying, digital reputation, respectful communication, and privacy. Their classroom resources page lets you filter by year level and topic — so you can find age-appropriate materials for your specific cohort in minutes. Highlights include the Mighty Heroes animated series and interactive game for primary students, the award-winning Cyberbullying short film for upper primary, and a suite of privacy and personal information activities that connect directly to the Digital Technologies curriculum.

The Best Practice Framework for Online Safety Education is also worth bookmarking — it provides an evidence-based structure for whole-school approaches to online safety, covering how to prepare policy, engage the community, educate students and staff, and respond to incidents. It aligns neatly with AITSL Standard 4 (Create and maintain supportive and safe learning environments).

🛡️ 5 Digital Citizenship Concepts Every Primary Student Needs
  • Digital footprint. Everything students do online leaves a trace — and many traces are permanent. Teach students to ask before posting: “Would I be happy if my teacher, my grandparent, or a future employer saw this?” This connects directly to the Digital Technologies curriculum content descriptor for Years 5–6 (AC9TDI6K04): students identify their digital footprint and recognise its permanence.
  • Privacy and personal information. What counts as personal information? Why does it matter who has it? The eSafety Commissioner’s privacy and security activities walk students through this concretely and age-appropriately. Help students understand the difference between public and private, and why platforms collect data.
  • Critical evaluation of online content. Not everything online is true. Not everything is what it appears to be. Students need explicit practice in identifying reliable sources, recognising bias, and detecting manipulation — skills that are directly aligned with the Australian Curriculum’s Critical and Creative Thinking General Capability.
  • Respectful online communication. The tone students use online matters. Teach the concept of the “online disinhibition effect” in age-appropriate terms: people sometimes say things online they would never say face-to-face, because the screen creates a false sense of distance. Empathy doesn’t switch off when you open an app.
  • Help-seeking. If something goes wrong online — and at some point it will — students need to know who to tell, what to say, and that telling an adult is the right move, not a betrayal of friends. The eSafety Commissioner’s I need help page for young people is worth sharing with your class.

Moving Beyond the Poster: Teaching It in Context

The most effective digital citizenship teaching doesn’t happen in isolation — it happens when real situations arise, when students have genuine questions, and when the content is embedded in authentic learning experiences. Schools that are getting this right are not running digital citizenship as a separate subject; they are weaving it into HASS Civics and Citizenship units, into English (media literacy and text analysis), into Health (wellbeing and relationships), and into the everyday fabric of how the school talks about technology use.

Some approaches that work particularly well in Australian primary classrooms:

Scenario-based discussion. Rather than telling students what to do, present them with genuine dilemmas and ask them to reason through it. The eSafety Commissioner’s Making Good Choices Online slide deck does exactly this — placing students in the shoes of a character and asking them to decide what to do. Connecting this to our earlier discussion of higher-order questioning strategies is natural: “What would you do if…?”, “What might happen if…?”, and “How might the other person feel if…?” are all HOTS questions applied to digital life.

News and media literacy investigations. Bring in real examples (age-appropriate) of misleading content, out-of-context images, or sponsored posts that don’t look like advertising. Ask students to investigate using the SIFT method (Stop, Investigate the source, Find better coverage, Trace claims). This is enquiry-based learning applied to digital information — and it’s some of the most genuinely important critical thinking work students will do.

Digital citizenship connected to the social media ban. The under-16 social media law is a live, real-world policy that students have opinions about and questions around. Use it. Explore it as a civics issue: Why did the government make this decision? Who supported it? Who opposed it? What evidence did they use? What rights and responsibilities are in tension? This connects directly to assessment for and as learning — students analysing and evaluating real-world evidence is exactly what good HASS looks like.

The Whole-School Dimension

Individual classroom teaching matters enormously, but it is most effective when it sits within a coherent whole-school approach. The eSafety Toolkit for Schools provides a four-category framework — Prepare, Engage, Educate, Respond — that helps schools audit their current approach and build systematic improvement. It includes self-assessment tools, policy checklists, risk assessment frameworks for new technologies, and guidelines for managing online incidents outside school hours.

If your school doesn’t yet have a clear, current digital citizenship policy — one that addresses not just rules but education — this toolkit is the right starting point. And given that the Child Safe Standards now require schools to maintain online spaces that are safe and well-monitored, this is no longer optional. It is a professional and legal responsibility.

For preservice teachers, this connects directly to AITSL Standard 4.5 (Use ICT safely, responsibly and ethically). Demonstrating on prac that you understand the online safety dimensions of your digital tool choices — and that you teach students to think critically about their digital lives — is increasingly expected, and increasingly impressive to assessors who understand where education is heading.

“Digital citizenship is not about fear. It is about equipping young people with the thinking skills and the confidence to navigate the digital world as active, critical, and caring participants.” — Adapted from eSafety Commissioner, 2025

💬 Your Turn! How does your school approach digital citizenship — as a standalone topic, embedded across curriculum, or somewhere in between? Have the social media age restrictions changed the conversation in your staffroom? Share your experience below!

References

Australian Curriculum, Assessment and Reporting Authority (ACARA). (2023). Australian Curriculum v9.0: Digital Technologies. https://v9.australiancurriculum.edu.au

Australian Institute for Teaching and School Leadership (AITSL). (2018). Australian Professional Standards for Teachers (Standard 4.5). https://www.aitsl.edu.au/teach/standards

eSafety Commissioner. (2025). Best Practice Framework for Online Safety Education. https://www.esafety.gov.au/educators/best-practice-framework

eSafety Commissioner. (2025). Classroom resources for educators. https://www.esafety.gov.au/educators/classroom-resources

eSafety Commissioner. (2025). Supporting digital literacy for under-16s. https://www.esafety.gov.au/educators/supporting-digital-literacy-for-under-16s

eSafety Commissioner. (2025). Toolkit for Schools. https://www.esafety.gov.au/educators/toolkit-schools

Ribble, M. (2015). Digital citizenship in schools: Nine elements all students should know (3rd ed.). International Society for Technology in Education.

Why “Good Job!” Isn’t Good Enough Feedback

We’ve all written it. That encouraging red-pen scrawl at the bottom of a student’s work: “Well done! Keep it up!” It feels kind. It feels supportive. But here’s the uncomfortable truth — it tells the student absolutely nothing about how to improve. And if improving is the point of education, we might need to rethink our feedback habits.

John Hattie and Helen Timperley’s (2007) landmark paper on feedback remains one of the most cited works in education research for good reason. They found feedback has an average effect size of 0.73 on student achievement — making it one of the most powerful influences on learning. But — and this is crucial — the type of feedback matters enormously. Vague, evaluative feedback (“good work”) has minimal impact. Specific, actionable feedback changes everything.


The 3 Feedback Questions Every Student Needs Answered

Hattie and Timperley’s model centres on three fundamental feedback questions. Every piece of effective feedback should address at least one of these:

🎯 The Three Feedback Questions
  • Where am I going? (Feed up) — What is the learning goal? What does success look like?
  • How am I going? (Feed back) — How is my current performance relative to that goal?
  • Where to next? (Feed forward) — What specific action will help me improve or extend my understanding?

Most teacher feedback addresses only the second question — and often vaguely. The most underused is the third: feed forward. This is where the real learning lives. For a broader overview of how feedback sits within the assessment cycle, see our earlier post on understanding assessment for, as, and of learning.

Written Feedback: Making Every Minute Count

Let’s be honest — marking 28 books on a Friday night is a special kind of exhaustion. So the question isn’t just “what makes feedback effective?” but “how do we make it sustainable?” Here are three approaches that work in real Australian classrooms. And if you’re still building your broader formative assessment toolkit, that earlier post is worth a read alongside this one.

1. The 2 Stars and a Wish. A classic for good reason. Two specific, evidence-based positives (“Your use of the word ‘cascade’ to describe the waterfall was a beautiful word choice — it sounds like what it describes”) and one specific, achievable next step (“Now try beginning your next sentence with a different sentence starter — can you avoid starting with ‘The’?”). Quick to write. Clear for students.

2. Coded Feedback + Class Discussion. Instead of writing the same comment 20 times, develop a simple code. Underline powerful word choices in green. Circle punctuation errors in orange. Then have a five-minute class debrief where you address the patterns you saw across the whole class. Targeted, efficient, and the group discussion deepens understanding.

3. Verbal Feedback Stamp. A rubber stamp that says “Verbal Feedback Given” or a VF notation in your mark book. Stop and have a one-minute conversation with the student — face-to-face feedback is often more powerful than written feedback anyway. This counts as rich assessment evidence under AITSL standards.

Peer Feedback: Don’t Underestimate the Power of 9-Year-Olds

Peer feedback, when taught explicitly, can be extraordinarily powerful — and it’s directly aligned with the Australian Curriculum’s Personal and Social Capability strand. But the key word is taught. You cannot simply say “swap books and give each other feedback.” Students need sentence starters, they need a clear rubric or checklist, and they need to practise in low-stakes situations before applying it to valued work.

A simple scaffold: “I noticed that your writing… [observation]. This worked well because… [explanation]. One thing that might make it even stronger is… [suggestion].” Model it. Practise it together. Then watch students take genuine pride in helping each other grow.

The Feedback Loop: Closing the Circle

Here’s the question most teachers forget to ask: did the student actually act on the feedback? Dylan Wiliam (2011), whose work on formative assessment is widely used in Australian schools, argues that feedback only improves learning when students have the opportunity to use it. If you mark work on Friday and move on to a new topic Monday, the feedback loop never closes. Build in “feedback response time” — even 10 minutes at the start of the following lesson where students read, reflect, and act on your comments.

“The most important thing about feedback is what happens next. If nothing changes, it wasn’t feedback — it was just a comment.” — Adapted from Wiliam, 2011

A Final Note for Preservice Teachers

When you’re observed on prac, assessors are looking for evidence of AITSL Standard 5: Assess, provide feedback and report on student learning. They want to see that your feedback is purposeful — connected to your learning intentions, specific to the student, and genuinely designed to move their learning forward. “Good work!” won’t cut it. A targeted, warm, specific comment? That’s the mark of a reflective, professional teacher.

When it comes to designing tasks that make feedback truly meaningful, it’s also worth reading our post on creating a performance of worth — summative tasks that give students something genuinely worth their best effort, and give you something genuinely worth your best feedback.

💬 Your Turn! What’s your go-to feedback strategy? Have you tried coded feedback or verbal feedback stamps? We’d love to hear what works in your classroom — share in the comments below!

References

Australian Institute for Teaching and School Leadership (AITSL). (2018). Australian Professional Standards for Teachers (Standard 5). https://www.aitsl.edu.au/teach/standards

Black, P., & Wiliam, D. (1998). Assessment and classroom learning. Assessment in Education: Principles, Policy & Practice, 5(1), 7–74. https://doi.org/10.1080/0969595980050102

Clarke, S. (2008). Active learning through formative assessment. Hodder Education.

Hattie, J. (2009). Visible learning: A synthesis of over 800 meta-analyses relating to achievement. Routledge.

Hattie, J., & Timperley, H. (2007). The power of feedback. Review of Educational Research, 77(1), 81–112. https://doi.org/10.3102/003465430298487

Wiliam, D. (2011). Embedded formative assessment. Solution Tree Press.

You Asked a Great Question – Now What?

Last week we explored the difference between lower-order and higher-order questions — and why the questions we ask signal the depth of thinking we’re demanding from our students. If you missed it, you can read that post here. But there’s a sequel to that conversation that doesn’t get nearly enough attention: what do you actually do with the answers?

Asking a great HOTS question is only half the job. The other half — the half most of us were never explicitly taught — is reading what those responses tell you in real time, and having both the skill and the confidence to change direction when the room is telling you something isn’t landing. Think of it like a football coach at three-quarter time: the game plan was perfect on paper, but the scoreboard is telling a different story. Great coaches adjust. Great teachers do too.


Why “Pushing Through” Costs More Than You Think

Be honest: how many times have you been twelve minutes into a lesson — one you spent two hours planning — and sensed the room slipping? Eyes glazing. The same three hands going up again and again. Bodies turning sideways. And you kept going anyway, hoping it would click by the end?

Most of us have. The instinct to push through is understandable — you’ve planned this, the content needs covering, and pivoting mid-lesson can feel like losing ground. But the research tells a clear story about what we’re sacrificing when we do.

Black and Wiliam’s landmark 1998 review of over 250 studies established that improving the quality of in-class, moment-to-moment assessment substantially raised student achievement — far more than end-of-unit tests or term benchmarks. The greatest lever on learning, they found, is what happens between teacher and student inside the lesson, right now. Wiliam (2011) later gave this a name: “contingent teaching” — instruction that is genuinely responsive to what students are doing, rather than proceeding through a predetermined script regardless of what’s actually happening in the room. It is the opposite of pushing through.

John Hattie’s Visible Learning synthesis reinforces the point, placing formative evaluation at an effect size of 0.90 — nearly double the threshold he considers educationally meaningful (Hattie, 2009). The critical caveat, as both Hattie and Wiliam emphasise, is that information you collect but don’t act on is just noise. Reading the room is what transforms that information into learning.


“Teachers need to know about the learning, and they need to know about it while it is still happening, while there is still time to do something about it.” — Wiliam, 2011, p. 50

What “Reading the Room” Actually Looks Like

Reading the room is not a mysterious sixth sense that experienced teachers develop after decades in the classroom. It is a set of observable, learnable signals — and like any professional skill, it sharpens with deliberate practice. Here are the four most reliable ones to watch for, with questions at the heart of each:

🔍 The 4 Signals to Watch For
  • Participation patterns. Who is answering your questions? If the same three students are carrying every response, the other 25 are passengers — not learners. Equity of voice is a real-time diagnostic. When only a handful of students are engaged, the rest have quietly checked out.
  • Body language clusters. One student leaning back is a data point. Five students leaning back simultaneously is a trend worth acting on. Train yourself to scan for clusters, not outliers — the pattern across the room is what matters.
  • The nature of student questions. When students are genuinely with you, their questions push the learning forward — they want to know more, go further, explore the edges. When they’re lost, their questions go backward — asking you to repeat what you just said, or falling silent altogether. In an Australian primary classroom, prolonged silence in response to a question is rarely a sign of deep thinking. It usually means students have stopped trying to keep up.
  • The gap between expected and actual output. You asked for three sentences applying a new concept. Most students wrote one sentence restating the definition. That gap between what you anticipated and what arrived on the page is perhaps the most reliable signal of all — and it pinpoints precisely where the thinking broke down.

Planning for the Pivot Before You Walk In the Door

Here’s a planning insight that changes everything: most lesson plans are written entirely around success. Here’s the hook, here’s the content, here’s the activity, here’s the close. Very few lesson plans include the equally important contingency: if this isn’t landing, here is what I will do instead. If you’d like to revisit the fundamentals of lesson planning, our earlier post on planning the teaching-learning cycle is a great starting point.

The fix is not complicated. Before each lesson, spend three minutes identifying one or two simple moves you can make if the room signals confusion. Not dramatic overhauls — small, targeted adjustments that take two to three minutes and redirect the learning without abandoning the lesson entirely. Dylan Wiliam (2011) refers to this kind of prepared responsiveness as a hallmark of truly expert teaching, and it is a skill that can be built systematically. Here are three go-to moves worth having in your toolkit:

⏸ 3 Mid-Lesson Pivot Moves
  • Move 1 — Turn and Talk with Purpose. Stop the delivery. Give students two minutes to turn to a partner and share: what makes sense so far, and what’s still fuzzy? This is not casual chat — you circulate and listen. What you overhear in those two minutes tells you exactly where to pick back up and what needs re-teaching. It’s Think-Pair-Share with a diagnostic purpose built in, and it re-engages students who have drifted by giving them a low-stakes way back into the learning.
  • Move 2 — The Single Diagnostic Question. This is where your Blog 1 toolkit pays off directly. Pose one carefully chosen HOTS question that requires students to apply what you’ve just taught — not recall it. Crucially, ask students to write their answer before anyone shares aloud. Mini whiteboards are ideal: every student holds up a simultaneous response and you scan the room in under ten seconds. You are not looking for the right answer — you are looking for the pattern in the wrong answers, because that pattern reveals precisely where understanding broke down and where your next teaching move needs to target.
  • Move 3 — Back Up and Re-Enter. When you recognise that the room is genuinely lost, resist the urge to push forward faster or layer more explanation on top of existing confusion. Instead, mentally rewind: identify the last point in the lesson where students were demonstrably with you, back up to that point, and re-enter it with a different approach — a concrete example, a visual, a brief hands-on activity, a different analogy. This takes real confidence, because it feels like losing ground. It is not. Pressing on over a shaky foundation is what loses ground.

What This Looks Like in an Australian Primary Classroom

You’re mid-way through a Year 4 HASS lesson on how laws are made in Australia. You’ve explained the legislative process and now you throw out the HOTS question from your board: “If you disagreed with a new law, what could you do about it — and which option do you think would be most effective, and why?” Students write their responses on mini whiteboards and hold them up.

You scan the room in ten seconds. Almost everyone has written some version of “vote.” Barely anyone has mentioned advocacy, community campaigns, petitions, protest, or contacting their local Member of Parliament. The content went in — but the thinking hasn’t gone deep enough yet.

That’s your signal. You don’t push to the next slide. Instead, you put a real example on the board — perhaps the long campaign by Indigenous Australians and their allies to change the date of the national public holiday — and ask: “What did people actually do here? Which of these strategies seemed to make a difference, and why?” You’ve backed up, re-entered at the right level, and now the HOTS question has genuine traction. The adjustment took three minutes. The depth of learning it unlocked was worth every second.

Building It Into Your Reflective Practice

Like any professional skill, mid-lesson responsiveness gets sharper the more deliberately you practise it. One of the most effective ways to build it is through a brief post-lesson reflection — three questions, two minutes, straight after the bell: At what point did I first notice the room wasn’t with me? What did I do in response? What might I have done differently? Over time, this kind of structured reflection builds pattern recognition. You start noticing the signals earlier. Your pivot repertoire grows. The lag between sensing something is off and doing something about it shrinks — and that is what separates responsive teaching from reactive teaching.

For preservice teachers, this matters beyond the classroom too. AITSL Standard 3.3 requires that you demonstrate the use of teaching strategies that respond to the learning strengths and needs of students, and Standard 5.4 asks you to interpret student assessment data to evaluate student learning. A diagnostic question mid-lesson, read carefully and acted upon, is live evidence of both — and among the most convincing things an assessor can observe on a prac visit. For a broader toolkit of responsive teaching strategies, see our post on teaching strategies worth having in your repertoire.


“Expert teachers monitor learning constantly and use this information to adjust their instruction. They treat the lesson as a hypothesis to be tested, not a script to be delivered.” — Adapted from Hattie & Yates, 2014

💬 Your Turn! Have you ever deliberately stopped a lesson mid-stream and changed direction? What was the signal that told you it was time? Share your story below — your experience might be exactly what another teacher needs to hear this week!

References

Australian Curriculum, Assessment and Reporting Authority (ACARA). (2023). Australian Curriculum v9.0. https://v9.australiancurriculum.edu.au

Australian Institute for Teaching and School Leadership (AITSL). (2018). Australian Professional Standards for Teachers (Standards 3.3 & 5.4). https://www.aitsl.edu.au/teach/standards

Black, P., & Wiliam, D. (1998). Assessment and classroom learning. Assessment in Education: Principles, Policy & Practice, 5(1), 7–74. https://doi.org/10.1080/0969595980050102

Black, P., Harrison, C., Lee, C., Marshall, B., & Wiliam, D. (2004). Working inside the black box: Assessment for learning in the classroom. Phi Delta Kappan, 86(1), 8–21. https://doi.org/10.1177/003172170408600105

Hattie, J. (2009). Visible learning: A synthesis of over 800 meta-analyses relating to achievement. Routledge.

Hattie, J., & Yates, G. (2014). Visible learning and the science of how we learn. Routledge.

Leahy, S., Lyon, C., Thompson, M., & Wiliam, D. (2005). Classroom assessment: Minute by minute, day by day. Educational Leadership, 63(3), 18–24.

Wiliam, D. (2011). Embedded formative assessment. Solution Tree Press.

Wiliam, D., & Leahy, S. (2015). Embedding formative assessment: Practical techniques for K–12 classrooms. Learning Sciences International.

Stop Talking — Start Questioning: The Art of Higher-Order Questions in Your Classroom

“The quality of a teacher’s questions tells you more about their pedagogy than any lesson plan ever could.”

⏱ 4 min read  ·  Category: Pedagogy / New Teachers

Here’s a moment most of us recognise. You’ve just delivered what felt like a cracking lesson. The kids were (mostly) engaged, you got through your content, and you asked plenty of questions along the way. But when you reflect later, you realise nearly every question you asked had a one-word answer. “What is photosynthesis?” “Who was the first Governor-General of Australia?” “What is 6 times 8?”

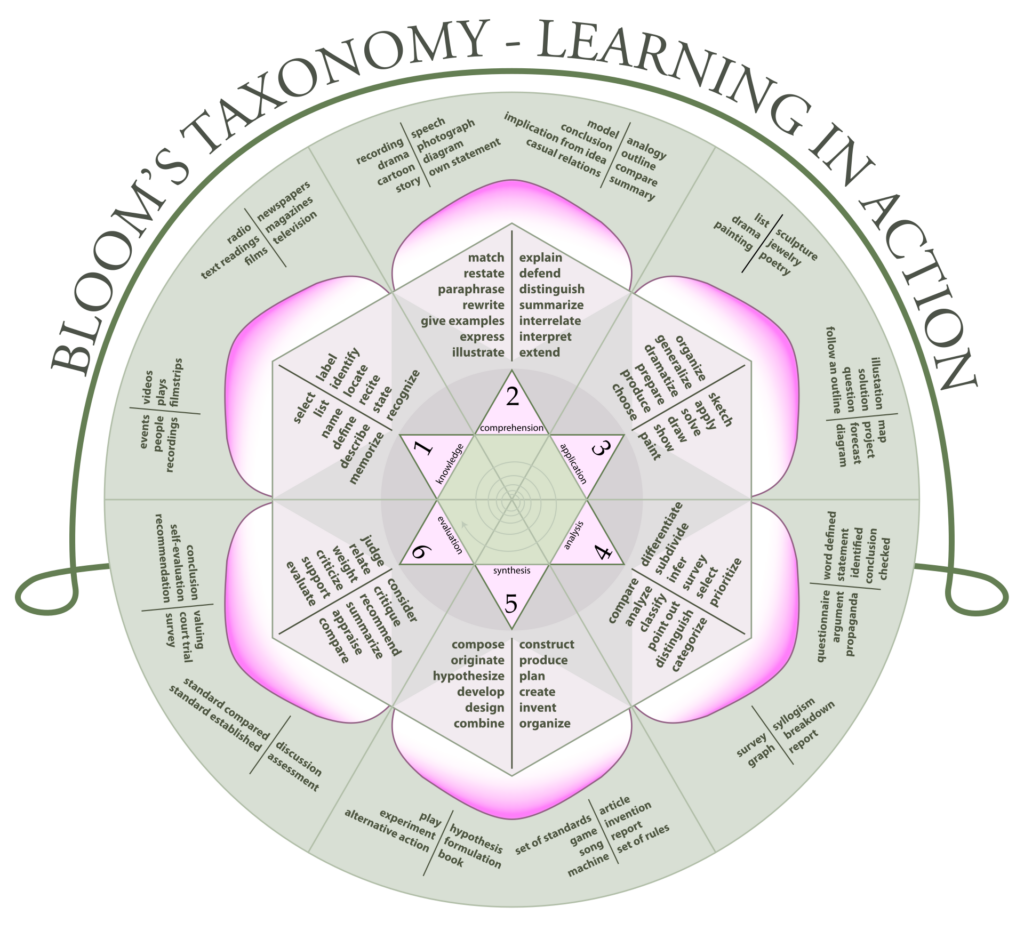
Sound familiar? You’re in great company — research consistently shows that the majority of classroom questions teachers ask sit at the bottom of Bloom’s taxonomy: recall and comprehension. And while there’s absolutely a place for knowledge retrieval, if that’s where the questioning stays, we’re leaving enormous learning potential on the table.


What Does the Research Say?

Benjamin Bloom’s taxonomy (1956), revised by Anderson and Krathwohl in 2001, remains one of the most practically useful frameworks in education. The revised model moves from Remembering at the base through Understanding, Applying, Analysing, Evaluating, to Creating at the apex. Higher-order questions push students into the top three levels — and this is where genuine critical thinking happens.

John Hattie’s landmark meta-analysis Visible Learning (2009) reinforced the power of teacher-student dialogue, finding that classroom discussion and questioning strategies have a significant effect on student achievement. More recently, Fisher and Frey (2014) describe “purposeful questioning” as a cornerstone of their gradual release of responsibility model — where the teacher’s role shifts from information-giver to intellectual provocateur.

“The questions we ask are the thinking we demand. Low questions = low thinking. If we want children to think critically, we need to ask critically.” — Adapted from Bloom et al.

The HOTS/LOTS Shortcut

A quick mental shorthand that works brilliantly in the classroom: LOTS (Lower Order Thinking Skills) vs HOTS (Higher Order Thinking Skills). LOTS questions have predictable, often single-word answers. HOTS questions require students to think, justify, compare, or create. Here’s the key difference in practice:

🔁 Flip Your Questions: LOTS → HOTS

  • LOTS: “What is an ecosystem?” → HOTS: “If a keystone species disappeared from an ecosystem, what do you predict would happen — and why?”
  • LOTS: “When was Federation?” → HOTS: “Was Australian Federation inevitable? What evidence supports your view?”
  • LOTS: “What is a simile?” → HOTS: “How does the author’s use of simile in this passage change how you feel about the character?”
  • LOTS: “What are the states of matter?” → HOTS: “Design an experiment that would demonstrate all three states of matter to a Year 3 class.”

3 Practical Strategies to Try This Week

1. The Parking Lot Question. Write a big, juicy HOTS question on the board at the start of the lesson — even before you’ve taught the content. Tell the students this is where you’re heading. It primes their brains, creates cognitive dissonance, and builds anticipation. Revisit it at the end.

2. Question Stems on a Lanyard Card. Create a small reference card of question stems aligned to each level of Bloom’s. Laminate it and keep it with you. When you feel yourself defaulting to LOTS questions, glance at the card. Stems like “How would you justify…”, “What is the relationship between…”, “How could you redesign…” are gold.

3. Wait Time. This is perhaps the single most powerful — and most underused — questioning technique. After asking a HOTS question, wait at least 5–7 seconds before accepting responses. Research by Mary Budd Rowe (1986) showed that extending wait time increased the length and quality of student responses dramatically. Silence is not failure — it’s thinking.

https://commons.wikimedia.org/wiki/File:Blooms_rose.svg


A Note for Australian Teachers

The Australian Curriculum’s General Capabilities — particularly Critical and Creative Thinking — explicitly require students to pose questions, consider alternatives, and evaluate evidence. Embedding HOTS questioning into your daily practice isn’t an add-on; it’s directly aligned with what ACARA expects. It also prepares students for NAPLAN reading and writing tasks that increasingly demand inferential and analytical thinking rather than simple recall.

💬 Your Turn! What’s your favourite HOTS question stem? Drop it in the comments below — let’s build a shared bank of great questions for Australian classrooms!

References

Anderson, L. W., & Krathwohl, D. R. (Eds.). (2001). A taxonomy for learning, teaching, and assessing: A revision of Bloom’s educational objectives. Addison Wesley Longman.

Australian Curriculum, Assessment and Reporting Authority (ACARA). (2023). Australian Curriculum v9.0: Critical and creative thinking. https://v9.australiancurriculum.edu.au

Bloom, B. S., Engelhart, M. D., Furst, E. J., Hill, W. H., & Krathwohl, D. R. (1956). Taxonomy of educational objectives: The classification of educational goals. Handbook I: Cognitive domain. David McKay.

Fisher, D., & Frey, N. (2014). Better learning through structured teaching: A framework for the gradual release of responsibility (2nd ed.). ASCD.

Hattie, J. (2009). Visible learning: A synthesis of over 800 meta-analyses relating to achievement. Routledge.

Rowe, M. B. (1986). Wait time: Slowing down may be a way of speeding up. Journal of Teacher Education, 37(1), 43–50. https://doi.org/10.1177/002248718603700110

I’m so over a KWL

Recently I have been looking at examples of integrated units of work, mostly from preservice teachers. Unfortunately, most of them commence an inquiry unit with a KWL (Know, Want to know and Learned) chart. Now, don’t get me wrong, there is nothing wrong with the occasional use of a KWL chart as an excellent diagnostic assessment of prior knowledge. If you don’t know where the students are at (their prior knowledge) then you could have to go away and spend more solitary evenings revamping your planned unit of work. This post walks through a few genuine alternatives to a KWL chart worth trying instead.

A traditional KWL chart template — Know, Want to Know, Learned

So what are the alternatives to a KWL chart? There are plenty of alternatives out there and I would love to hear from you below to add your favourites. One unit of work was for a Year 5 class about endangered animals and how we can protect them. Instead of a KWL chart, I suggested the following:

I would encourage you to think outside the KWL chart as an initial activity. Instead, could you present the students with a Venn diagram (3 circles) and 3 photos – a koala, a Tasmanian Tiger and an emu and ask them to note the similarities and differences? Hopefully, they will notice the koala is endangered (on the east coast of Australia) and the Tasmanian Tiger is extinct. The pairs/small groups could report back to the larger group and discuss their findings. The Venn diagrams go on display and already you have assessed their prior knowledge and created words for the word wall (endangered, extinct, nocturnal, etc.) 

A Venn diagram activity — one of several alternatives to a KWL chart

More Alternatives to a KWL Chart

Other teachers use a picture book or an image to arouse interest and commence discussions about the topic. The art is in asking probing questions to ascertain prior knowledge. There is not much point in showing a YouTube video before you assess prior knowledge as you have just contaminated their prior knowledge by presenting the information.

What advice would you give beginning teachers to introduce a unit of work/assess prior knowledge without using a KWL chart?

Planning

Lesson and unit planning for teachers is one of the most arduous tasks in the job — deciding what and how to teach on a term, month or weekly basis. It doesn’t just happen; it takes many hours of careful preparation to know:

  • the diverse needs of your students
  • curriculum content
  • pedagogical approaches
  • school-based curriculum maps and policies and
  • classroom management.

Teaching can never be replaced with robots as it is the integral knowledge and application of the above factors that lead to the craft of teaching.

If you do not spend adequate time planning, the students learning will be lessened and you are likely to have more classroom management issues. Well planned lessons that actively engage the students will enhance their learning and keep them on task.

Lesson and unit planning for teachers — fail to plan, plan to fail

Lesson and Unit Planning for Teachers: Where to Start

Planning is the first step in the teaching-learning cycle and begins with preparation. A thorough knowledge of the curriculum content is essential as these are the mandated outcomes/objectives/content descriptors you MUST teach and assess. Not only do you need to know the content for your year level (as a primary generalist teacher), but you also need to know the content the year preceding and following to allow for differentiation.

The teaching-learning cycle — where lesson and unit planning for teachers begins

Due to an overcrowded curriculum, some teachers try to integrate the curriculum content through the use of big concepts, themes or integrated units of work. You do not have to reinvent the wheel as there are many great units of work available on the internet to be modified for your own class. In addition, teachers can program together with similar year level/subject teachers or in teams.

The time spent in planning, especially in your first few years of teaching, will be rewarded. As a new teacher, run through each lesson for the next day in your head. Try to visualise how each part of the lesson will run. Have all the materials ready for the lesson and think about the movement of students issues to alleviate any possible disruptions.

A Weekly Planning Rhythm for Teachers

Term and unit plans set the direction. The weekly plan is where the term actually happens. A simple rhythm keeps lesson and unit planning manageable, even in a busy term.

Thursday or Friday: sketch next week. Check where each subject sits in its unit. Note any whole-school events, then block out assessment tasks first. Everything else fits around them.

Each afternoon: finish tomorrow in detail. Gather your materials and adjust the plan from what you saw today. A quick look at your exit tickets tells you who needs another go before you move on. These formative assessment checks are the bridge between today’s lesson and tomorrow’s plan.

Every fortnight: look up. Compare the unit plan with what you have actually taught. Trim what will not fit now, rather than rushing the last two weeks of term.

What Every Lesson Plan Needs

A lesson plan does not need to run for pages. In your first years, though, writing these parts down trains the habit:

  • a learning intention in student-friendly words
  • success criteria students can check their work against
  • a short review or hook to open the lesson
  • the teaching sequence, from modelling to guided practice to independent work
  • a check for understanding before students leave
  • materials, groupings and transitions
  • adjustments for students who need them.

Experienced teachers carry much of this in their heads. That only happens after years of writing it down first.

Going Deeper With Planning

This post covers the everyday basics. For the bigger picture, start with planning backwards from the outcome you want. From there, you can learn to plan for every learner with UDL and spot the signs it is time to fade the scaffold. Together they turn a good weekly plan into a well-designed unit.